User Guide
![]()
StudyTracker is a desktop app that tracks your most productive study spots, optimized for students who are familiar with Command Line Interfaces (CLI).
StudyTracker was built to solve the problem of not finding productive study spots. We aim to maximise students’ productivity by making it easy to find the best place to study.
Overview of main features:
- Make informed decisions of where to study — every study spot includes details about amenities like sockets, aircon, and crowd level, and more!
- Data-driven statistics to track time spent studying ensures you know where to go to be productive
- Made a mistake? Found out something new? Editing details is quick and simple!
- Powerful customization with user-defined aliases and custom themes!
- Built for cross-platform use with JavaFX. Bring your StudyTracker data with you to any Windows, Mac, or Linux device!
StudyTracker is full of features, but don’t worry! This User Guide provides clear, step-by-step information to use StudyTracker. If this is your first time using StudyTracker, How to use this guide is the perfect place to start.
Open up StudyTracker, and let’s get on the right track to productivity!
Want to contribute to development? Check out the Developer Guide instead.
Table of Contents
- Table of Contents
- Quick Start
- How to use this User Guide
- GUI Layout
- Features
- FAQ
- Glossary
- Command summary
Quick Start
StudyTracker comes with sample data. In this Quick Start section, we’ll go through a tutorial to try the essential features of StudyTracker.
Let’s explore how we add a new study spot and track our study time with it:
-
Ensure you have Java
11or above installed in your Computer. -
Download the latest
StudyTracker.jarfrom here. -
Copy the file to the folder you want to use as the home folder for your StudyTracker.
-
Double-click the file to start the app. The GUI similar to the one below should appear in a few seconds. Note how the app contains some sample data.
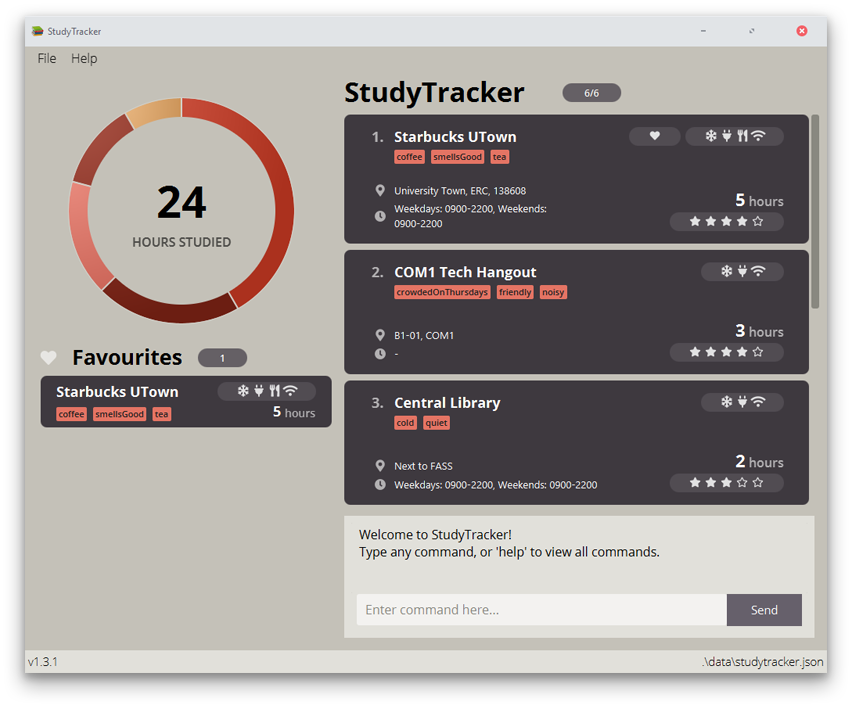
Figure 1 - GUI of StudyTracker -
Type the command in the command box and press Enter to execute it. e.g. typing
helpand pressing Enter will open the help window.Do the following commands in sequence:
-
list: Lists all study spots. Study spots are shown in cards on the right panel of the program. -
addn/FASS Benches r/5 m/wifi: Adds a study location namedFASS Benches, with a rating of 5 and ‘wifi’ amenity to the StudyTracker. You’ll see it if you scroll down the list of study locations! -
logn/FASS Benches hr/3: Logs 3 hours of study time atFASS Benches. The card will update with the new study hours. Notice how the pie chart on the left of the GUI updates with the hours spent! Try hovering over the pie chart to find your newly-added study spot! -
exit: Exits the app.
-
-
Congratulations! You’ve just added a new study spot, and logged your study time! You’re on the right track to productivity!
-
Refer to the Features section for more commands and features in StudyTracker.
How to use this User Guide
This section provides tips on reading this document, as well as how to navigate it.
This User Guide is structured so that it is easy for you to find what you need. If this is your first time using StudyTracker, don’t worry! You will have no problems using our app as long as you read this User Guide in order, starting from this section.
We recommend you to have the StudyTracker application open, so you can try out the commands and features as you go along!
The Table of Contents contains links to all the sections of the guide.
Common Symbols found in this guide and How to read Commands in StudyTracker section will help you understand this document better. You can then look at the GUI Layout and Features sections for clear instructions for using StudyTracker.
Common Symbols found in this guide
| Symbol | Description |
|---|---|
| This symbol indicates that something important to take note of. | |
| This symbol indicates that we are mentioning a tip. | |
| This symbol indicates something to be careful of. | |
| This symbol indicates where you can go back to the top (Table of Contents) |
How to read Commands in StudyTracker
Throughout the User Guide, you’ll see commands to enter into StudyTracker. Here is how to read the command format:
Command Structure
Commands use a multipart structure that must be specified in this order:
-
Command word which may be user-created aliases (detailed further in Aliases).
- Parameters and Flags. A command may have more than one flag and/or parameters.
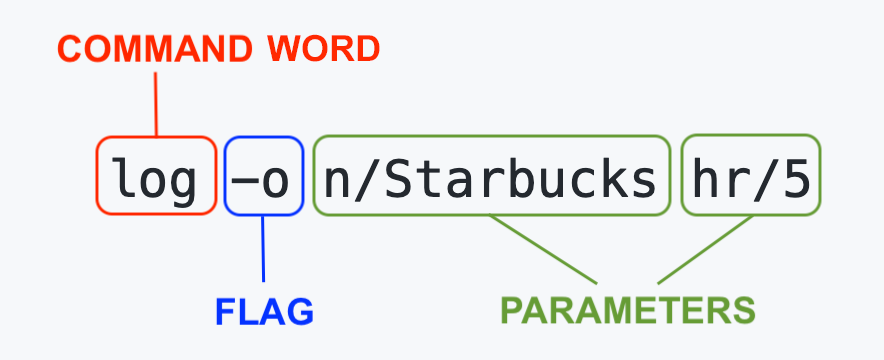
Figure 2 - Command Structure
Flags
Commands may contain flags. All flags are optional.
Flags are represented by a dash, and a sequence of characters.
e.g. the list command has a -f flag to list only favourites.
Here is a list of common flags used.
| Flags | Features that support these flags |
|---|---|
Favourite -f
|
list |
Amenities -m
|
list |
Rating -r
|
list |
Tags -t
|
list |
Override -o
|
log |
Reset -r
|
log |
Reset All -ra
|
log |
Show -s
|
alias |
Parameters
-
Each parameter may have a delimiter.
e.g. theNAMEparameter has a delimitern/and theAMENITYparameter has a delimiterm/. -
You will supply words in
UPPER_CASEas the parameters.
e.g. inadd n/NAME*,NAMEis a parameter which can be used asadd n/COM1 Basement. -
You are required to enter parameters with an asterisk
*, while those without an asterisk are optional.
e.g You can usen/NAME* m/AMENITY...asn/COM1 Basement m/wifior asn/COM1 Basement. -
Parameters with
… after them can be used multiple times including zero times.
e.g. You can uset/TAG...ast/noisy,t/mosquitos t/sunnyetc. -
Parameters can be in any order.
e.g. if the command specifiesn/NAME* a/ADDRESS,a/ADDRESS n/NAME*is also acceptable.
![]() Caution:
Caution:
-
If a parameter is expected only once in the command, but you specified it multiple times, only the last occurrence of the parameter will be taken.
e.g. if you specifyn/COM1 n/CLB, StudyTracker will only taken/CLB. -
Extraneous parameters for commands that do not take in parameters (such as
help,exitandclear) will be ignored.
e.g. if the command specifieshelp 123, it will be interpreted ashelp.
Here is a list of common delimiters used.
| Delimiters | Features that support these delimiters |
|---|---|
Name n/
|
add, edit, fav, unfav, delete
|
Spot spot/
|
edit |
Address a/
|
add, edit
|
Operating Hours o/
|
add, edit
|
Studied Hours hr/
|
add, log
|
Rating r/
|
add, edit, list
|
Amenity m/
|
add, edit, list
|
Tag t/
|
add, edit, list
|
Remove tag rt/
|
edit |
Remove amenity rm/
|
edit |
Alias al/
|
alias, unalias
|
Command cmd/
|
alias, unalias
|
How to use these Commands in Command Line Interface
If this is your first time using Command Line Interface (CLI), fret not and we will guide you step-by-step on how to use CLI!
You tell the Command Line Interface exactly what you want it to do! However, if you input something that the CLI does not understand, then the program will not be able to help you. Inputs that the CLI understand are called valid, while those that are not understood are called invalid.
Some valid user inputs for the add command are provided below:
add n/PC Commons a/UTown t/veryCrowded m/wifi r/4-
add n/COM2 Basement r/3(optional arguments are not required) -
add n/TR3 r/4 a/Yusof Ishak House m/wifi m/aircon(multiple amenities are acceptable)
Some invalid user inputs for the add command are provided below:
-
add n/PC Commons(missingRATINGparameter) -
add PC Commons /UTown /very crowded /toilet /4*(delimiters and slashes missing from parameters, unnecessary asterisk added outside of parameters) -
n/PC Commons a/UTown r/4(missing command wordadd)
If you accidentally entered a wrong command, don’t worry! A comprehensive error message will show up in the display immediately to guide you to entering the correct command.
-
In the Graphical User Interface Layout, the Command Box can be found at the bottom. This is where you will tell the program what to do.
-
Click on the box that says “Enter command here…”, and simply type in whatever input you want.
-
Press enter (or click the send button) to submit the command to the program. Remember that the input should be valid! Or else the program will not know what to do 😢.
-
After pressing enter, your command has successfully been given to StudyTracker to be processed! You have just successfully executed a command.
Congratulations! 🎉 You should now know how to use CLI. Now all you need to know are the commands you can give to the CLI to play around with it.
GUI Layout
This section introduces the Graphical User Interface (GUI) of StudyTracker.
 Figure 3 - GUI Layout
The top of the interface contains the Menu Bar. Clicking on File or Help will open up the Settings menu and the Help window
respectively.
On the left side of the interface, you can find the Info Display.
On the right side of the interface, you can find the Study Spot List and Command Box.
Info Display
The Info Display contains the Pie Chart and Favourites List.
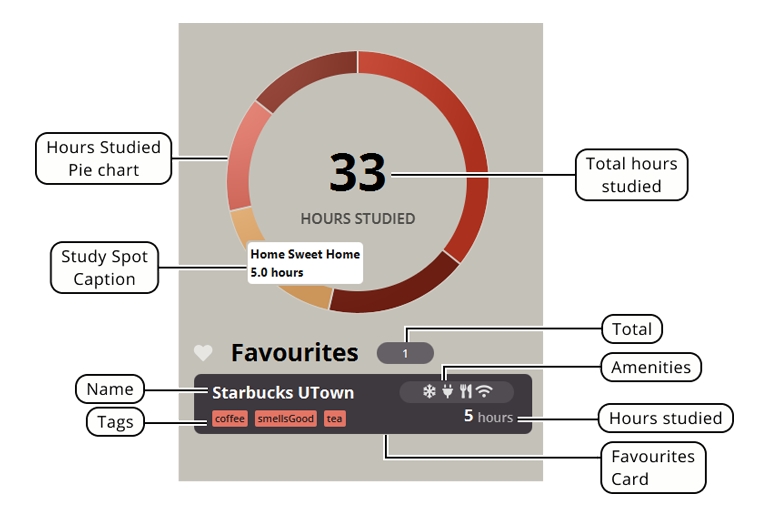 Figure 4 - Info Display Layout
The Hours Studied Pie Chart displays statistics of time spent studying at the top five study spots in terms of the number of hours studied.
- Moving your cursor over any segment of the pie chart will show a
Study Spot Captionwith details of the corresponding study spot -
Total hours studiedwill show the total number of hours studied over all study spots
The Favourites List contains Cards representing all favourited study spots in StudyTracker.
The Total tag at the top shows total number of favourited study spots in StudyTracker.
-
Name— name of study spot -
Tags— user-defined tags for the study spot -
Amenities— the icons represent the amenities present in study spot. From left to right, the amenities are aircon, charger, food, wifi. -
Hours studied— total number of hours studied at study spot
Study Spot List
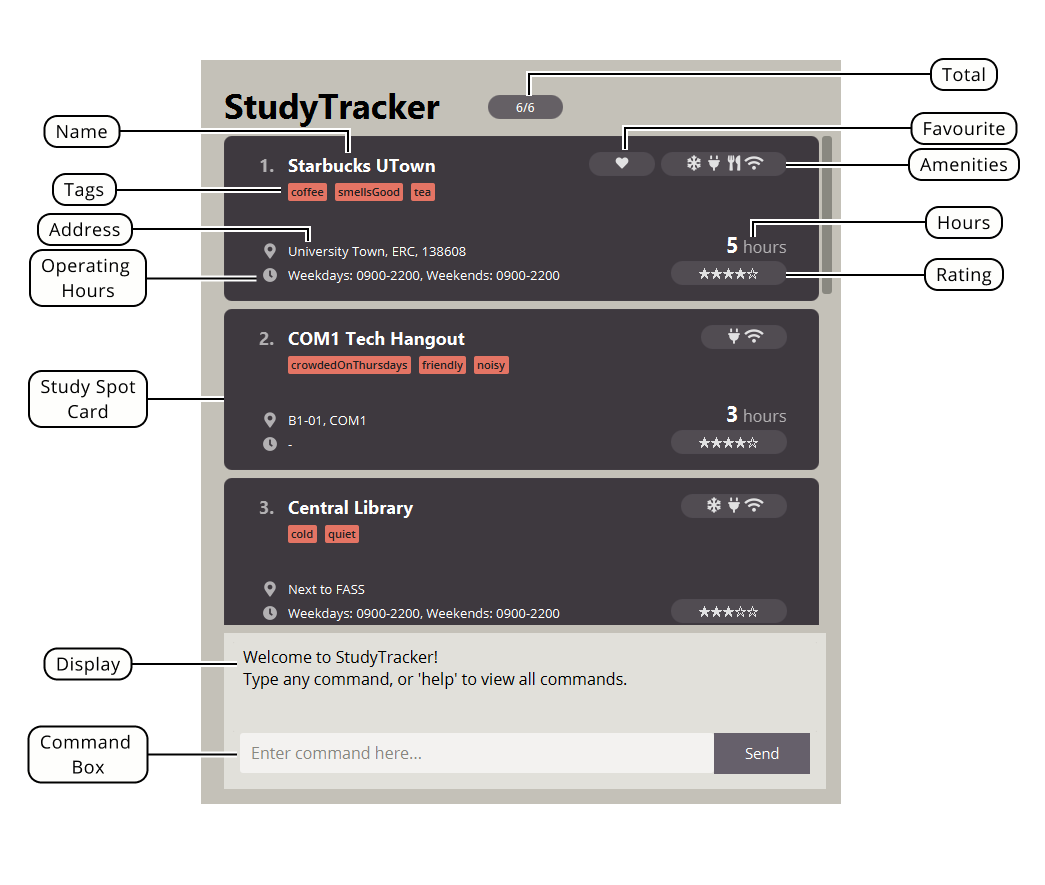 Figure 5 - Study Spot List Layout
The Study Spot List contains Cards representing every study spot in StudyTracker.
The Total tag at the top shows current visible study spots/total number of study spots in StudyTracker.
Scroll down the list to view all the study spots!
-
Name— name of study spot -
Tags— user-defined tags for the study spot -
Address— address of study spot -
Operating Hours— operating hours of study spot on weekdays and weekends -
Favourite— this icon indicates the study spot is a favourite -
Amenities— the icons represent the amenities present in study spot. From left to right, the amenities are aircon, charger, food, wifi. -
Hours— total number of hours studied at study spot -
Rating— user-defined rating for the study spot out of 5
Command Box
The Command Box is where you can enter commands in StudyTracker.
-
Command Box— type in your commands here -
Display— results of commands and error messages are shown here.
Features
This section introduces all the features in StudyTracker.
Features are grouped according to usage. Click on the groups to view clear, step-by-step usage instructions!
clear command).
| Features | Usage and commands |
|---|---|
| Managing study spots | Commands that manage the study spots in this app Commands: add, edit, fav, unfav, delete, clear
|
| Managing StudyTracker list | Commands to filter and view specific study spots Commands: list, find
|
| Logging study hours | Commands to log study hours Commands: log
|
| Setting aliases | Commands to create and remove aliases Commands: alias, unalias
|
| Viewing help | View the built-in help manual Commands: help
|
| Exiting the program | Exit StudyTracker Commands: exit
|
| Managing themes | Customize the look of StudyTracker |
| Data | Manage and save user data and user preferences |
Managing study spots
Adding a study spot: add
Found a new study spot? You can add the study spot to your StudyTracker by making use of the add command.
Format: add n/NAME* r/RATING* a/ADDRESS t/TAG... m/AMENITY... o/OPERATING_HOURS
- Adds a study spot with
NAME. - You can only add amenities from this list of 4 amenities:
wifi,food,charger,aircon. Any other amenities entered will give you an error message. - You can only enter tags that are one-word long. If you wish to use more than one word, you can use Camel Case
(e.g.
t/veryCrowded) - You can only enter ratings that are integers from 0 to 5, inclusive.
- You can indicate that a study spot closes on the next day by entering a closing hour that is earlier than the opening hour.
- You can indicate that a study spots opens for 24 hours by entering identical opening and closing hours.
Examples: You can try executing the commands in the input rows and check if you get the corresponding output!
| Input | Output |
|---|---|
add n/COM1 Basement r/5 |
New study spot added: COM1 Basement; Rating: 5 |
add n/Starbucks at UTown r/4 t/noisy m/wifi o/0800-2000,0900-2200 |
New study spot added: Starbucks at UTown; Rating: 4; Operating Hours: Weekdays: 0800-2000, Weekends: 0900-2200; Tags: [noisy]; Amenities: [wifi] |
Editing a study spot : edit
If you made a mistake in your add command, or wish to change the details of a study spot due to newly-discovered
amenities,
you can easily do so by making use of the edit command!
Format: edit spot/NAME* n/NEW_NAME a/NEW_ADDRESS t/NEW_TAG m/NEW_AMENITY r/NEW_RATING o/NEW_OPERATING_HOURS rt/OLD_TAG rm/OLD_AMENITY
- Edits the study spot matching
NAME. The providedNAMEis case-insensitive and must fully match the study spot name. - You must provide at least one of the optional fields.
- StudyTracker will update the details of the given study spot with any provided
NEW_NAME,NEW_ADDRESS,NEW_RATING,NEW_AMENITY,NEW_TAGandNEW_OPERATING HOURS, while removing any providedOLD_TAGandOLD_AMENITY. - When editing tags and amenities, using
t/orm/will be adding on top of existing tags and amenities. - You can remove a specific tag or amenity with the
rt/orrm/parameter respectively. - You can remove all the study spot’s tags by typing
t/orm/respectively without specifying any tags after it.
Examples: You can try executing the commands in the input rows and check if you get the corresponding output!
| Input | Output |
|---|---|
edit spot/COM1 Basement n/Basement |
Edited study spot: Basement; Rating: 5 |
edit spot/outside cool spot r/4 t/coffee |
Edited study spot: Outside cool spot; Rating: 4; Address: COM2; Studied Hours: 10; Tags: [warm][drinks][coffee]; Amenities: [wifi][charger][food] |
edit spot/home sweet home t/ |
Edited study spot: Home Sweet Home; Rating: 1; Address: 42 Wallaby Way; Amenities: [wifi][charger] |
Adding a study spot to Favourites: fav
Really enjoyed studying somewhere? You can add this study spot to your favourites by using the fav command! This will
make the Study Spot appear in the Favourites List, reminding you of your favourite study spots
every
time you open StudyTracker.
Format: fav n/NAME*
Examples: You can try executing the commands in the input rows and check if you get the corresponding output!
| Input | Output |
|---|---|
fav n/COM1 Tech Hangout |
Added study spot to favourites: COM1 Tech Hangout |
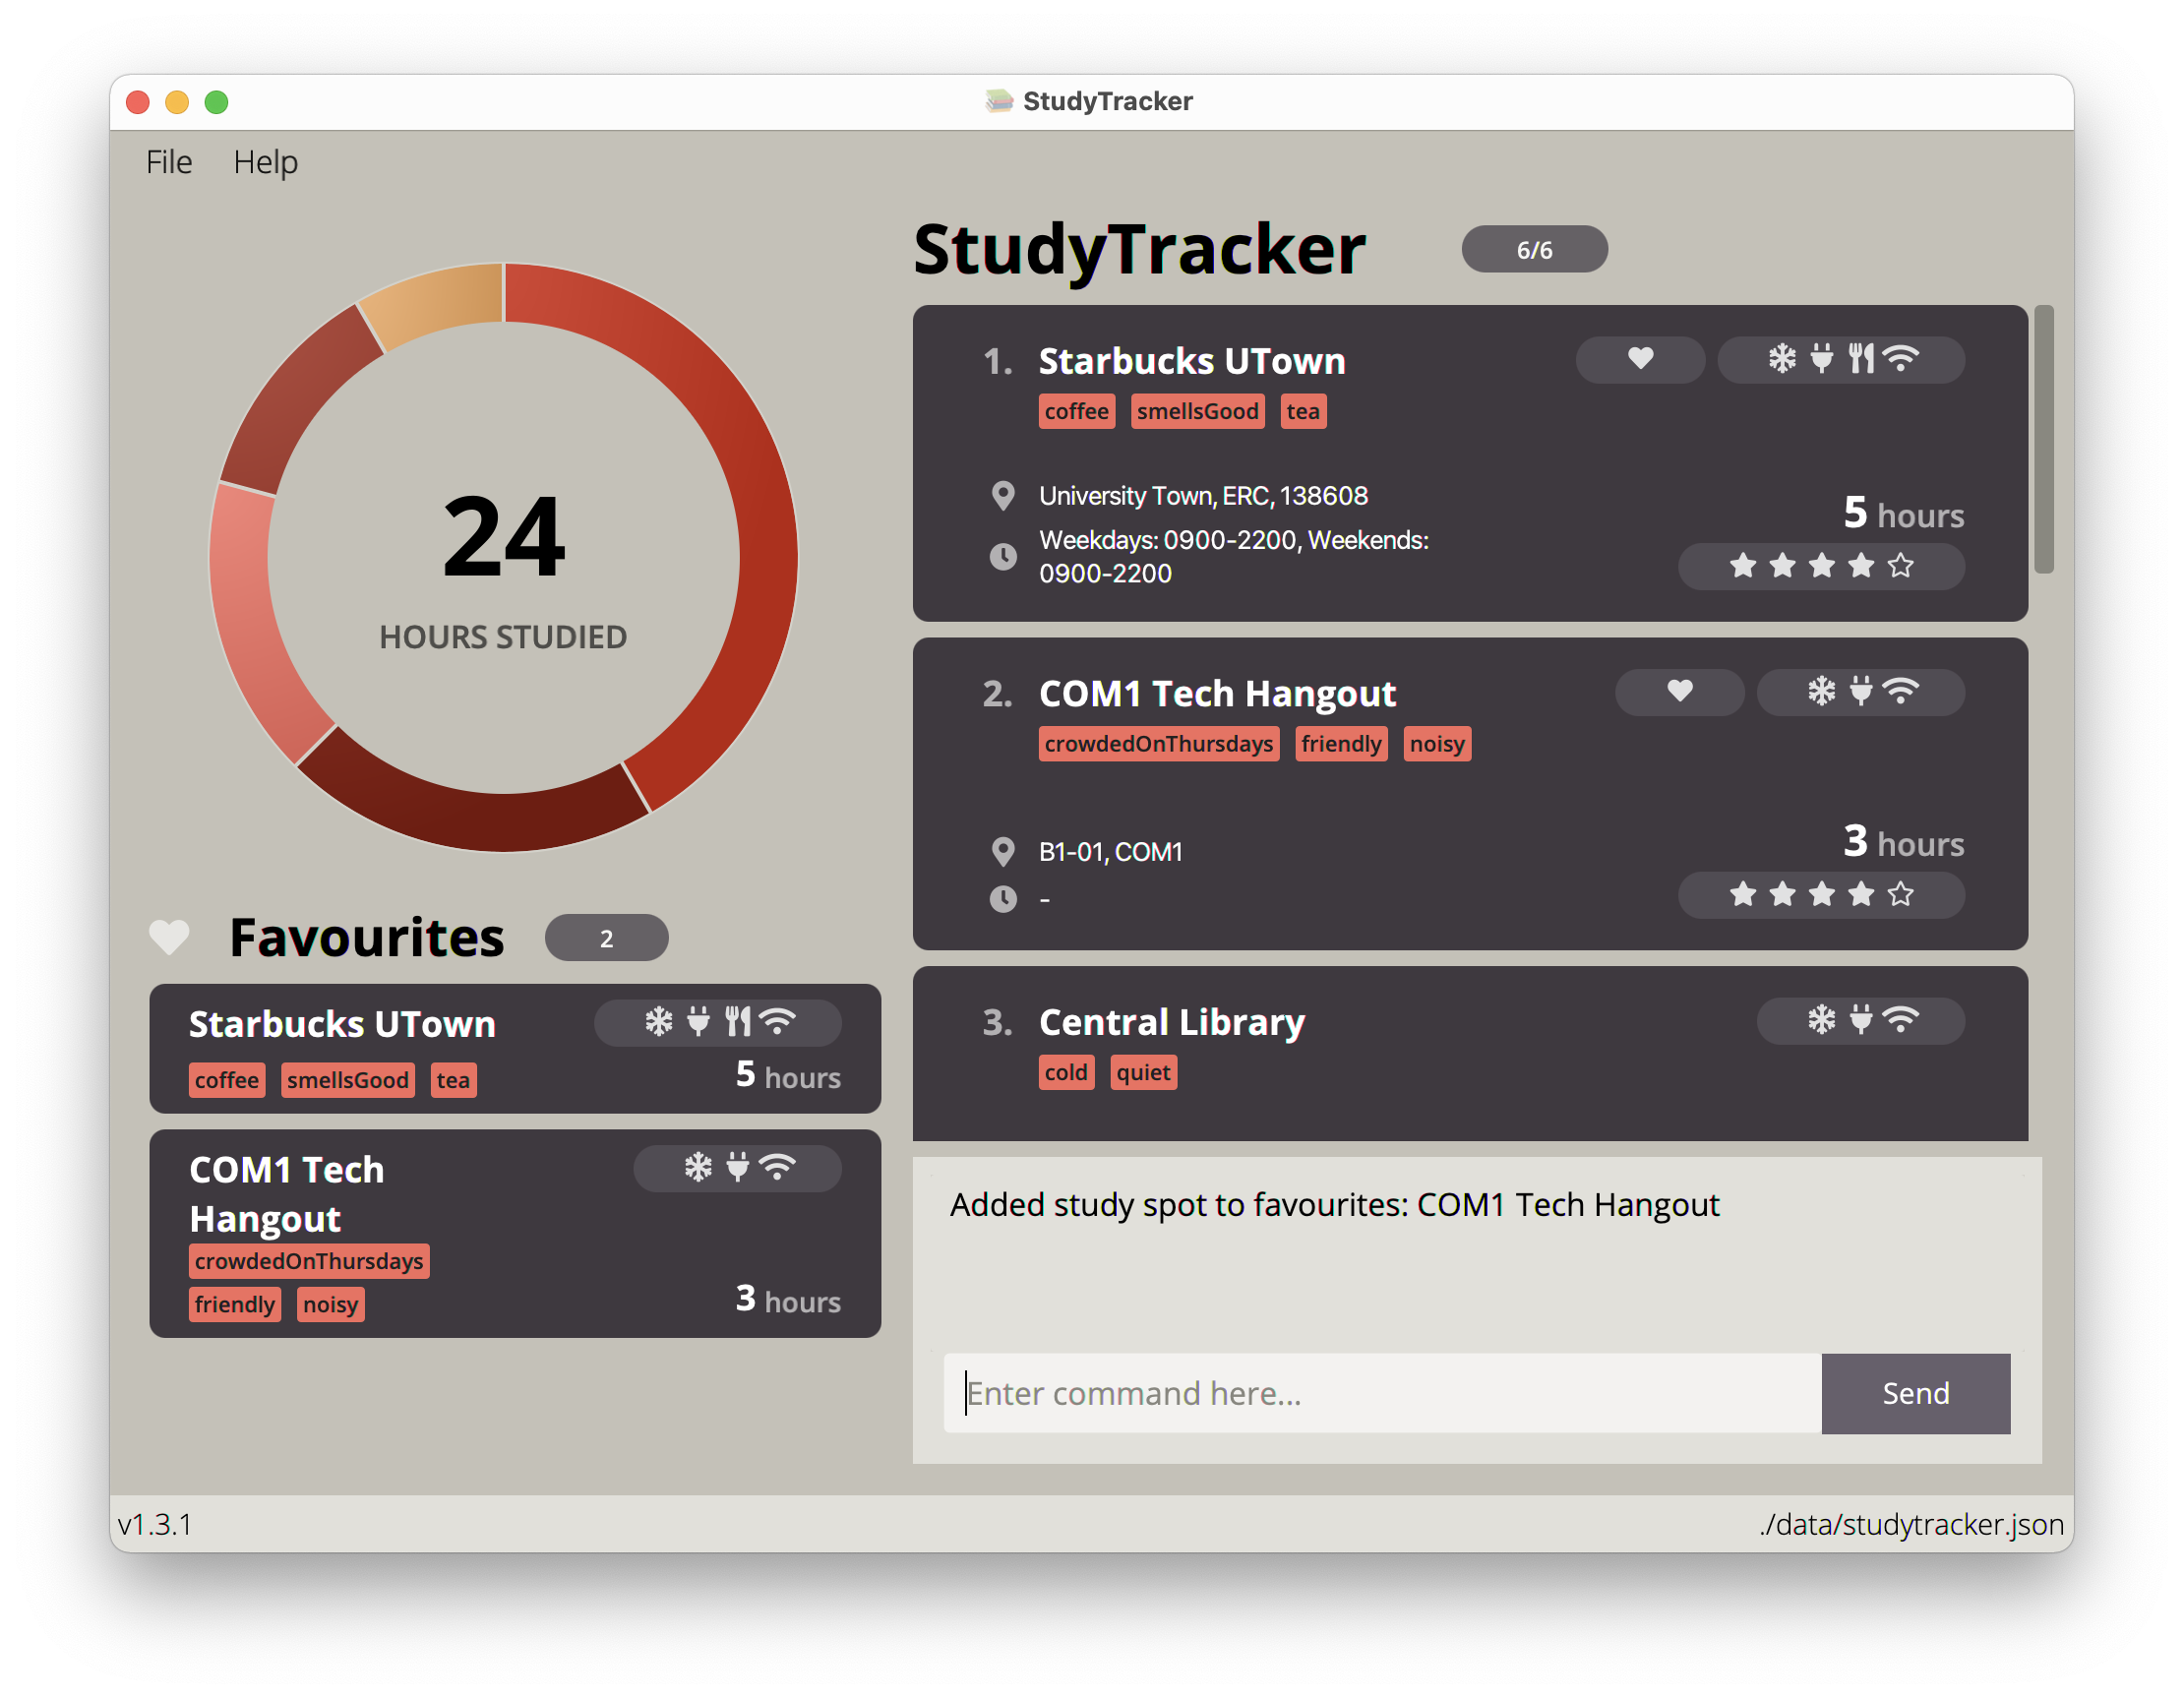 Figure 6 - Example of Adding Favourites
Removing a study spot from Favourites: unfav
Did one of your favourite study spots suddenly decide to ban students from studying there, and you decide it is time to unfavourite a spot?
You can make use of the unfav command to do so.
Format: unfav n/NAME*
Examples: You can try executing the commands in the input rows and check if you get the corresponding output!
| Input | Output |
|---|---|
unfav n/com1 tech hangout |
Removed study spot from favourites: COM1 Tech Hangout |
Deleting a study spot : delete
Decided that you never want to go back to a study spot as it was extremely unconducive for studying? You can use the
deletecommand to do so.
Format: delete n/NAME*
- Deletes the study spot matching
NAME. The providedNAMEis case-insensitive and must fully match the study spot name.
Examples: You can try executing the commands in the input rows and check if you get the corresponding output!
| Input | Output |
|---|---|
delete n/Basement |
Deleted study spot: Basement |
Clearing all entries : clear
Moving to a new location and decide to start your list afresh? You can make use of the clear command to clear the entire list of
study spots.
Format: clear
Example: You can try executing the commands in the input rows and check if you get the corresponding output!
| Input | Output |
|---|---|
clear |
StudyTracker has been cleared! |
Managing StudyTracker list
Listing study spots : list
Want to find all the study spots that have the amenity “aircon”? Or perhaps list all the study spots you tagged with
“freeWater”? You can make use of the list command and its various different flags to get what you want.
Note that the results of the list command will only contain StudySpots that matches ALL the
specifications provided by the user.
Below shows the corresponding flag to its function.
| Flag | Function |
|---|---|
No flag (i.e. list) |
Lists out all study spots (clears any filters previously applied) |
-f |
Shows all favourited study spots |
-t t/TAG... |
Shows all study spots with the specified tags |
-m m/AMENITY... |
Shows all study spots with the specified amenities |
-r r/RATING |
Shows all study spots with the specified rating |
Examples: You can try executing the commands in the input rows and check if you get the corresponding output!
| Input | Output |
|---|---|
list |
Listed all study spots |
list -t t/coffee -m m/wifi -r r/4 |
Listed all study spots with Tags: [coffee] with Amenities: [wifi] with Rating: 4 |
 Figure 7 - Example of listing study spots with wifi, coffee tag and rating of 4
Locating a study spot by name: find
Trying to find a study spot by its name? You can use the find command to easily do so!
Format: find KEYWORD* MORE_KEYWORDS...
- The search is case-insensitive. e.g
librarywill matchLibrary - StudyTracker will only match full words. e.g.
Libwill not matchLibrary - StudyTracker will return study spots matching at least one keyword.
- For example,
find library spotwill matchCentral LibraryandCool Spotas both the search results forlibraryandspotare shown.
Examples: You can try executing the commands in the input rows and check if you get the corresponding output! Note that the specific number of study spots listed may differ from what you see, depending on what study spots you have.
| Input | Output |
|---|---|
find library |
2 study spot(s) listed! |
Logging study hours: log
After studying at a certain study spot, you can log how many hours you have studied at this location.
There are also various flags you can use to reset or override hours to the value of your choice.
Use the -r, -o or -ra flags respectively, as shown below:
| Format | Function |
|---|---|
log n/NAME* hr/NUM_OF_HOURS* |
Adds the given NUM_OF_HOURS to the original studied hours at a study spot |
log -o n/NAME* hr/NUM_OF_HOURS* |
Overrides the current studied hours with the given NUM_OF_HOURS
|
log -r n/NAME* |
Resets the number of studied hours at a study spot to 0 |
log -ra |
Resets studied hours of ALL study spots to 0 |
-ra is present in the command, hours for all study spots will be reset to 0.Example: You can try executing the commands in the input rows and check if you get the corresponding output!
| Input | Output |
|---|---|
log n/Starbucks UTown hr/2 |
Logged 2 hours at Starbucks UTown! |
log -o n/Starbucks UTown hr/5 |
Changed hours to 5 at Starbucks UTown! |
log -r n/Starbucks UTown |
Reset hours at Starbucks UTown! |
log -ra |
Reset hours for all study spots! |
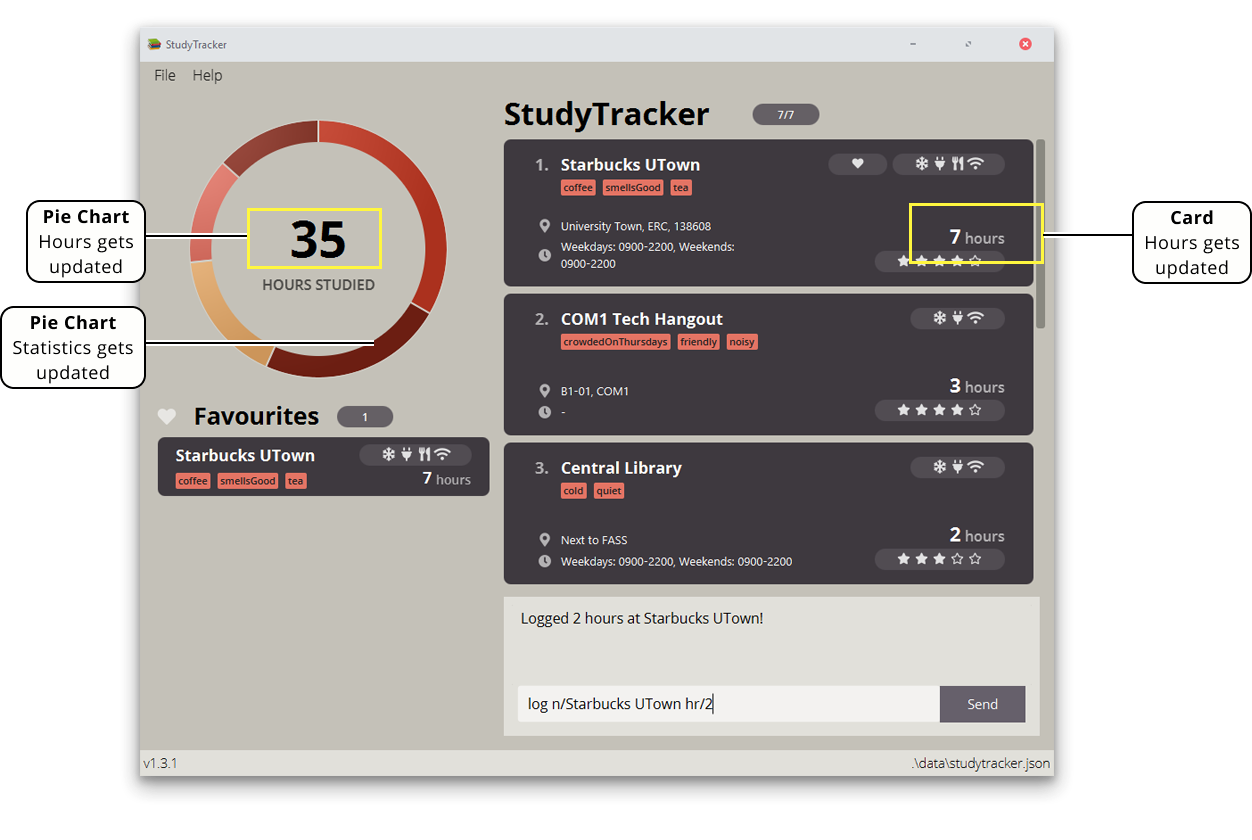 Figure 8 - Example of Log command
Logging 2 hours to ‘Starbucks UTown’ with the command log n/starbucks utown hr/2 (as seen in Input 1) would update the study spot card, as well as statistics on the pie chart.
Setting Command Aliases
Adding command aliases : alias
Do you find yourself using certain commands so often that you wish you could “code-name” it so you don’t need to type so much?
Alias is the command for you. The alias command can help you to shorten input commands to whatever you want it to be.
| Format | Function |
|---|---|
alias -s |
Shows all aliases that you have set |
alias al/ALIAS* cmd/COMMAND* |
Sets and alias, where ALIAS is the shortcut and COMMAND is the given input you wish to alias |
Example:
| Input | Output | Usage of Alias | Output |
|---|---|---|---|
alias al/ml cmd/list |
Added alias ml: [list] | ml |
Listed all study spots |
- running
mlwill run thelistcommand.
Example:
| Input | Output | Usage of Alias | Output |
|---|---|---|---|
alias al/LogCLB cmd/log n/Central Library hr/ |
Added alias LogCLB: [log n/Central Library hr/] | LogCLB 3 |
Logged 3 hours at Central Library! |
Running LogCLB 3 would then result in log n/Central Library hr/3, allowing you to log a variable number of study hours to ‘Central Library’!
Removing command aliases: unalias
If you do not like an alias you originally set, you can use unalias to remove that alias.
Format: unalias al/ALIAS* to remove alias
Example:
| Input | Output |
|---|---|
unalias al/ml |
Removed alias ‘ml’ |
Viewing help : help
Forgot a command? You can make use of the help command to get a quick overview of all commands available in StudyTracker!
Click on each command on the left panel to view usage instructions of each command.
You can also visit the User Guide and Developer Guide by clicking on the buttons in the window.
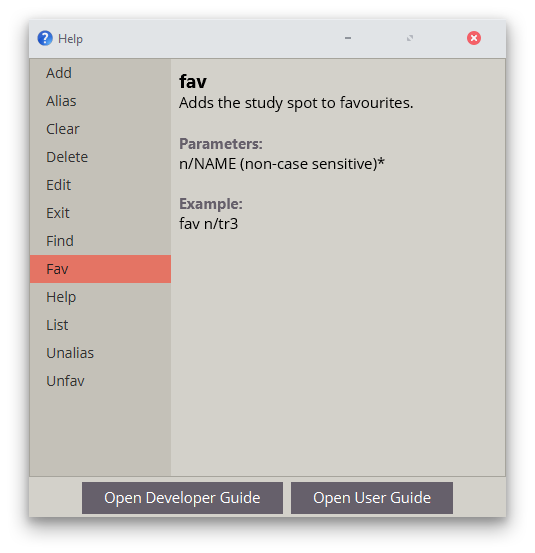
Figure 9 - Help Window
Format: help
Exiting the program : exit
Hands off the mouse and want to quickly close the app without getting your hands off the keyboard? Simply execute the exit command!
Format: exit
Default Command alias: bye, quit
Managing Themes
Personality matters, and you should be given a way to select a theme that speaks to you!
From File > Settings, select the colour theme you wish to use. Themes are saved in your user preferences, so the next time you
launch the application, rest assured that your colour theme will be set and ready to go!
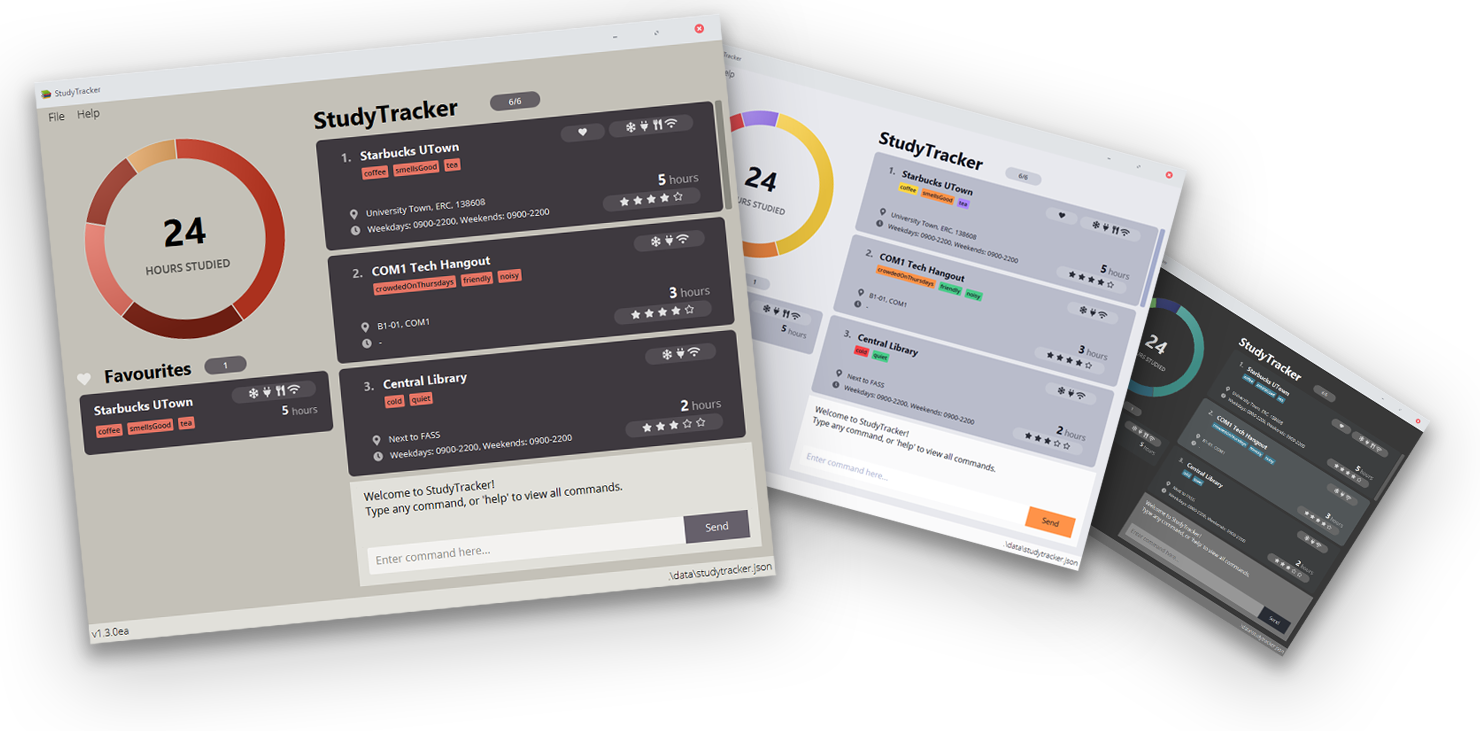 Figure 10 - Themes available
Data
Saving data
StudyTracker’s data is saved in the hard disk automatically after any command that changes the data. You can rest assured that you do not need to save your data manually.
Editing the data file
StudyTracker data are saved as a JSON file [home folder]/data/studytracker.json. Advanced users are welcome to update data directly by editing that data file.
FAQ
This section contains frequently asked questions (FAQs) about StudyTracker.
Q: How do I transfer my data to another Computer?
A: Install the app in the other computer and overwrite the empty data file it creates with the file that contains the data of your previous StudyTracker home folder.
You may also copy the preferences.json file to keep your user preferences.
Q: How should tags be used?
A: Tags are short bites of information about study spots. It is up to you to define how you use them. One way is
to use list to filter for study spots with a specified tag. You can refer to List
for more details.
Q: How do I receive updates for this app?
A: Currently, the app does not automatically update. You can check out the latest version here. Simply replace your current JAR file with the latest version.
Q: Can I contribute to the code as well?
A: Yes, of course! We’re open-source and are open to new ideas. You can contact anyone in the team on Github and create a pull request here.
Q: What do I do when I encounter bugs?
A: As much as possible, we rigorously test our application before it is released. However, should you encounter
bugs, you can raise issues to our team here
and we would
look to fix them in upcoming patches.
Glossary
| Term | Definition |
|---|---|
| Command Line Interface (CLI) | A user interface that accepts text input to execute commands. |
| Graphical User Interface (GUI) | A user interface that uses icons, menus and a mouse to interact with the system. |
| Syntax | The grammar that all commands follow for our software to understand it. Click here where we break it down for you! |
| Flags | Represented by a dash and a sequence of characters, flags modify the operation of a command and are sometimes called options. e.g. -f in the command list -f to list favourites |
| Parameters | Text used to specify information for a command needed to execute. |
| Delimiters | A sequence of characters used to specify places in a command where a parameter is given. |
Command summary
| Action | Format, Examples |
|---|---|
| Add |
add n/NAME* r/RATING* a/ADDRESS t/TAG... m/AMENITY... o/OPERATING_HOURS e.g. add n/COM1 r/5
|
| Edit |
edit spot/NAME* n/NEW_NAME a/NEW_ADDRESS t/NEW_TAG m/NEW_AMENITY r/NEW_RATING o/NEW_OPERATING_HOURS rt/OLD_TAG rm/OLD_AMENITYe.g., edit spot/tr3 n/Training Room 3
|
| Favourite / Unfavourite |
fav n/NAME* / unfav n/NAME* e.g. fav n/COM1 / unfav n/COM1
|
| Delete |
delete n/NAME* e.g. delete n/COM1
|
| Clear | clear |
| List |
list -f -t t/TAG... -m m/AMENITY... -r r/RATING e.g. list -f -t t/quiet -m m/wifi -r r/5
|
| Find |
find KEYWORD* MORE KEYWORDS...e.g. find library
|
| Log |
log -o n/NAME* hr/NUM_OF_HOURS* e.g. log -o n/Starbucks hr/5
|
| Alias / Unalias |
alias al/ALIAS* cmd/COMMAND* / unalias al/ALIAS*e.g. alias al/home cmd/find home / unalias al/ml
|
| Help | help |
| Exit | exit |