Developer Guide
![]()
StudyTracker is a desktop app that tracks your most productive study spots, optimized for students who are familiar with Command Line Interface (CLI).
After reading this Developer Guide, you will:
- be familiarized with the code base of StudyTracker
- understand the functional and non-functional requirements of the app
- understand how certain features work and their design considerations
This Developer Guide assumes that developers are familiar with Java 8, JavaFX, UML Diagrams, and Object Oriented Programming Principles.
Only want to know how to use StudyTracker? Check out the User Guide instead.
Table of Contents
- Table of Contents
- Acknowledgements
- Setting up, getting started
- Design
- Implementation
- Documentation, logging, testing, configuration, dev-ops
- Appendix: Requirements
- Appendix: Instructions for manual testing
Acknowledgements
- Libraries used: JavaFX, Jackson, JUnit5
- StudyTracker is an application developed based on the
AddressBook Level 3application created by the SE-EDU initiative. - Graphics acknowledgements can be found here
Setting up, getting started
To set up your development environment for StudyTracker, refer to this guide Setting up and getting started.
Design
This segment introduces the general architecture of StudyTracker.
.puml files used to create diagrams in this document can be found in the diagrams folder. Refer to the PlantUML Tutorial at se-edu/guides to learn how to create and edit diagrams.
Architecture
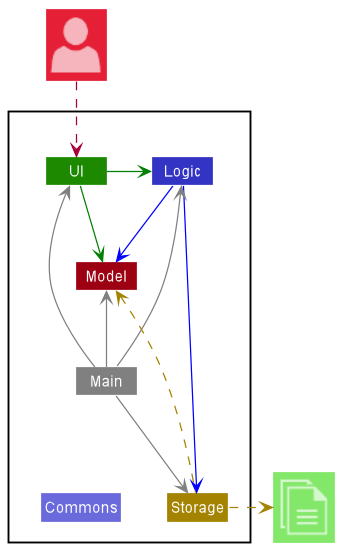
The Architecture Diagram given above explains the high-level design of the App.
Given below is a quick overview of main components and how they interact with each other.
Main components of the architecture
Main has two classes called Main and MainApp. It is responsible for,
- At app launch: Initializes the components in the correct sequence, and connects them up with each other.
- At shut down: Shuts down the components and invokes cleanup methods where necessary.
Commons represents a collection of classes used by multiple other components.
The rest of the App consists of four components.
-
UI: The UI of the App. -
Logic: The command executor. -
Model: Holds the data of the App in memory. -
Storage: Reads data from, and writes data to, the hard disk.
How the architecture components interact with each other
The Sequence Diagram below shows how the components interact with each other for the scenario where the user issues the command delete n/Central Library.
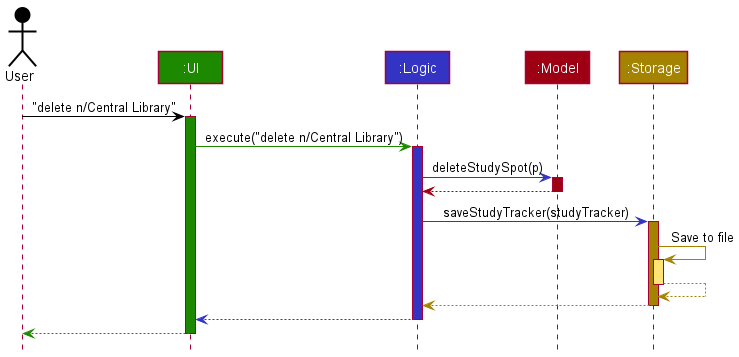
Each of the four main components (also shown in the diagram above),
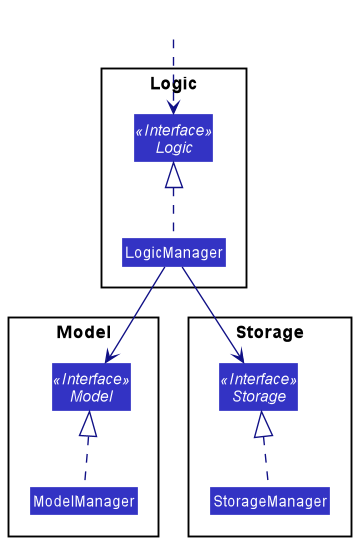
- defines its API in an
interfacewith the same name as the Component. - implements its functionality using a concrete
{Component Name}Managerclass (which follows the corresponding APIinterfacementioned in the previous point.
For example, the Logic component defines its API in the Logic.java interface and implements its functionality using the LogicManager.java class which follows the Logic interface.
Other components interact with a given component through its interface rather than the concrete class (reason: to prevent outside component’s being coupled to the implementation of a component), as illustrated in the (partial) class diagram below.
The sections below give more details of each component.
UI component
The API of this component is specified in Ui.java
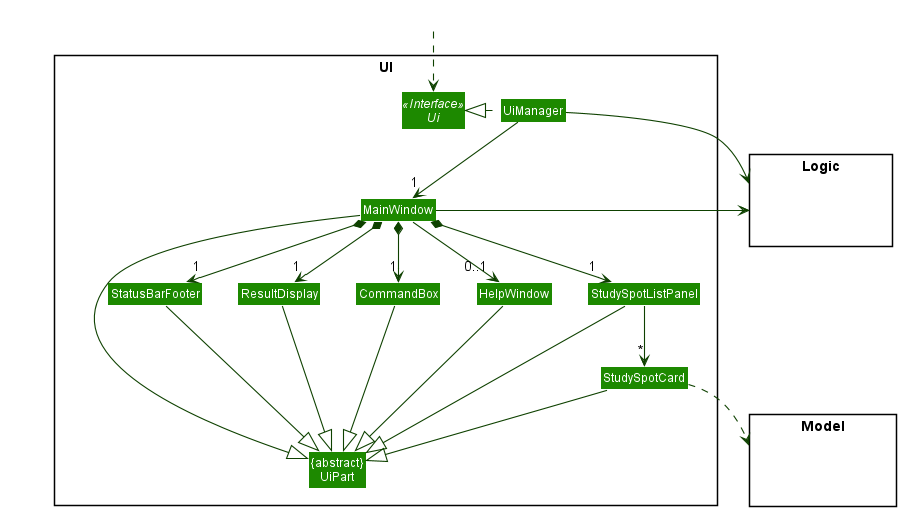
The UI consists of a MainWindow that is made up of parts e.g.CommandBox, ResultDisplay, StudySpotListPanel, StatusBarFooter etc. All these, including the MainWindow, inherit from the abstract UiPart class which captures the commonalities between classes that represent parts of the visible GUI.
The UI component uses the JavaFx UI framework. The layout of these UI parts are defined in matching .fxml files that are in the src/main/resources/view folder. For example, the layout of the MainWindow is specified in MainWindow.fxml
The UI component,
- executes user commands using the
Logiccomponent. - listens for changes to
Modeldata so that the UI can be updated with the modified data. - keeps a reference to the
Logiccomponent, because theUIrelies on theLogicto execute commands. - depends on some classes in the
Modelcomponent, as it displaysStudySpotobject residing in theModel.
Logic component
API : Logic.java
Here’s a (partial) class diagram of the Logic component:
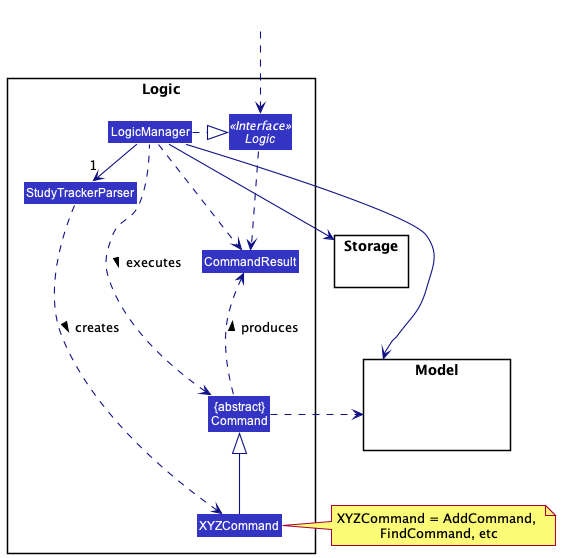
How the Logic component works:
- When
Logicis called upon to execute a command, it uses theStudyTrackerParserclass to parse the user command. - This results in a
Commandobject (more precisely, an object of one of its subclasses e.g.,AddCommand) which is executed by theLogicManager. - The command can communicate with the
Modelwhen it is executed (e.g. to add aStudySpot). - The result of the command execution is encapsulated as a
CommandResultobject which is returned fromLogic.
The Sequence Diagram below illustrates the interactions within the Logic component for the execute("delete n/Central Library") API call.

DeleteCommandParser should end at the destroy marker (X) but due to a limitation of PlantUML, the lifeline reaches the end of diagram.
Here are the other classes in Logic (omitted from the class diagram above) that are used for parsing a user command:
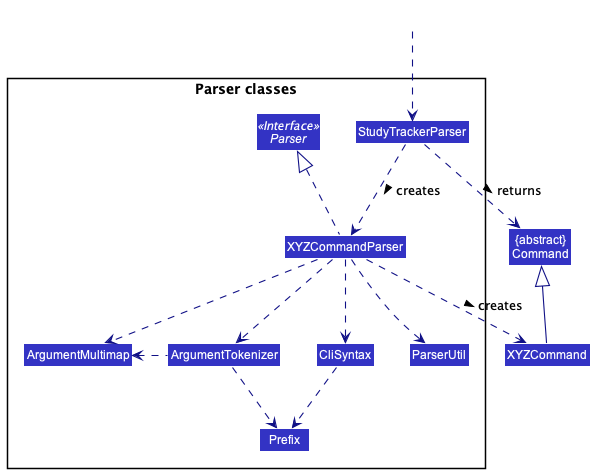
How the parsing works:
- When called upon to parse a user command, the
StudyTrackerParserclass creates anXYZCommandParser(XYZis a placeholder for the specific command name e.g.,AddCommandParser) which uses the other classes shown above to parse the user command and create aXYZCommandobject (e.g.,AddCommand) which theStudyTrackerParserreturns back as aCommandobject. - All
XYZCommandParserclasses (e.g.,AddCommandParser,DeleteCommandParser, …) inherit from theParserinterface so that they can be treated similarly where possible e.g, during testing.
Model component
API : Model.java
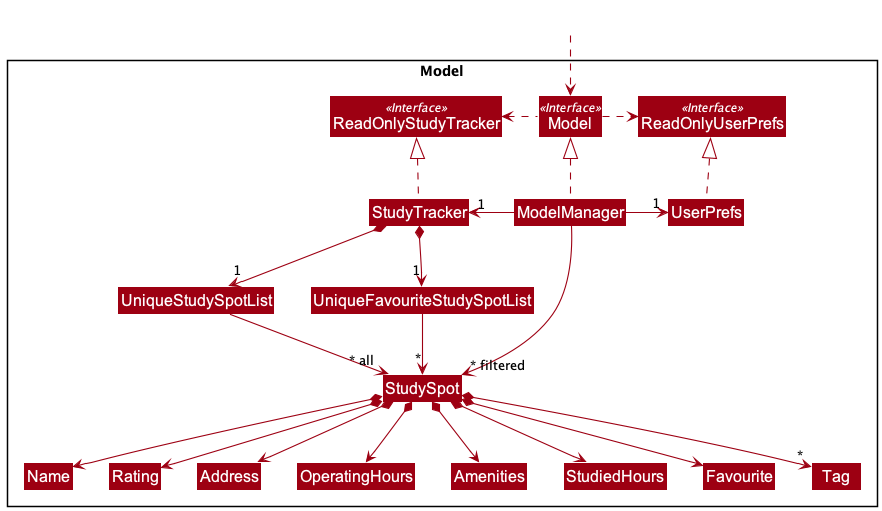
The Model component,
- stores the study tracker data i.e., all
StudySpotobjects (which are contained in aUniqueStudySpotListobject). - stores the currently ‘selected’
StudySpotobjects (e.g., results of a search query) as a separate filtered list which is exposed to outsiders as an unmodifiableObservableList<StudySpot>that can be ‘observed’ e.g. the UI can be bound to this list so that the UI automatically updates when the data in the list change. - stores a
UserPrefobject that represents the user’s preferences. This is exposed to the outside as aReadOnlyUserPrefobjects. - does not depend on any of the other three components (as the
Modelrepresents data entities of the domain, they should make sense on their own without depending on other components)
Tag list in the StudyTracker, which StudySpot references. This allows StudyTracker to only require one Tag object per unique tag, instead of each StudySpot needing their own Tag objects.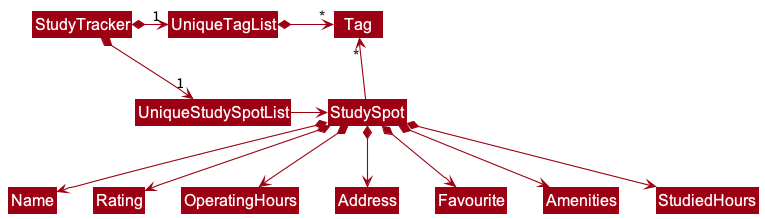
Storage component
API : Storage.java
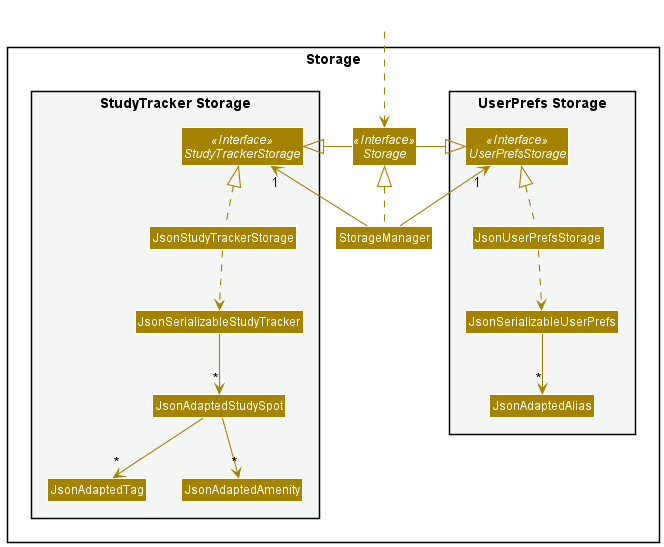
The Storage component,
- can save both study tracker data and user preference data in json format, and read them back into corresponding objects.
- inherits from both
StudyTrackerStorageandUserPrefStorage, which means it can be treated as either one (if only the functionality of only one is needed). - depends on some classes in the
Modelcomponent (because theStoragecomponent’s job is to save/retrieve objects that belong to theModel)
Common classes
Classes used by multiple components are in the seedu.address.commons package.
Implementation
This section describes some noteworthy details on how certain features are implemented.
Alias feature
Overview
The Alias command supports user-defined aliases for commands. These aliases are string values that will be replaced by commands (i.e. command expansion) during the execution of command.
Aliases are stored in the UserPrefs object.
Key terms
- Aliases — A user-specified string that is mapped to a command. Aliases cannot be defined to existing command words.
- Commands — A command must contain exactly one command word, all compulsory arguments and optional arguments if indicated. When executed, an action is performed.
-
Command Words — The main “verbs” representing commands in StudyTracker. A command word by itself is a command.
Example:
list,edit,findare command words. -
Well-formed command — A command is well-formed if it has exactly one command word (or alias) and optional arguments.
Examples:
-
list- well-formed -
add n/Starbucks— well-formed, since it contains command wordaddand argumentn/Starbucks. However, it is invalid (i.e. will throw and error when executed), since it is missing required argumentrating. -
myAdd t/cold— well-formed, since it contains aliasmyAddand argumentt/cold.myAddwill itself expand to another well-formed command (by definition of Alias). -
add list find n/Starbucks r/5— not well-formed, since it has 3 command words (only should have one). -
myAdd add n/Starbucks r/5— not well-formed, since it has both 1 alias and 1 command word (only should have one).
-
Implementation of Alias feature
The Alias feature is facilitated by three key classes: Alias.java, StudyTrackerParser.java, and UserPrefs.java.
Alias.java is responsible for creating new Aliases. It implements the following operations:
-
Alias#isValidUserAlias()— checks if Alias is valid (i.e whether it is a command word) -
Alias#isValidCommandWord()— checks if Alias maps to a valid command word in the StudyTracker list of commands.
StudyTrackerParser.java is responsible for parsing user commands. The key operations needed for Aliases are:
-
StudyTrackerParser#isInvokingAlias()— checks if the user input is a normal command, or one that invokes an Alias belonging inUserPrefs. -
StudyTrackerParser#expandAlias()— parses the Alias into its corresponding command. StudyTrackerParser will prepend the arguments from the expanded command before the arguments in user input, if any.
UserPrefs.java is responsible for storing and reading Aliases from disk. The key operations needed for Aliases are:
-
UserPrefs#getUserAliases()— Returns the list of Aliases defined by the user. -
UserPrefs#setUserAliases()— Saves the current list of Aliases defined by the user.
Given below is an example usage scenario and how the Alias feature behaves at each step.
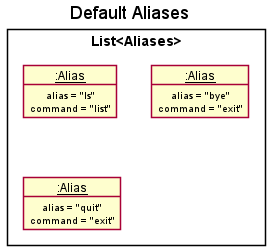
Step 1. The user launches the application for the first time. The program loads with default Aliases.
Step 2. The user executes alias al/myAdd cmd/add r/5 n/ which creates an alias myAdd with command add r/5 n/.
The alias command calls Model#addAlias(), adding this newly created alias to the Model and in UserPrefs.
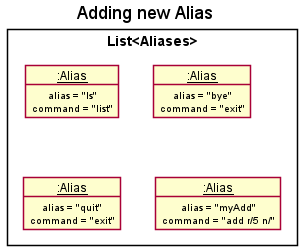
n/ argument to be valid.
However, this is allowed, as it is one of the key features for the flexibility of the Alias feature.
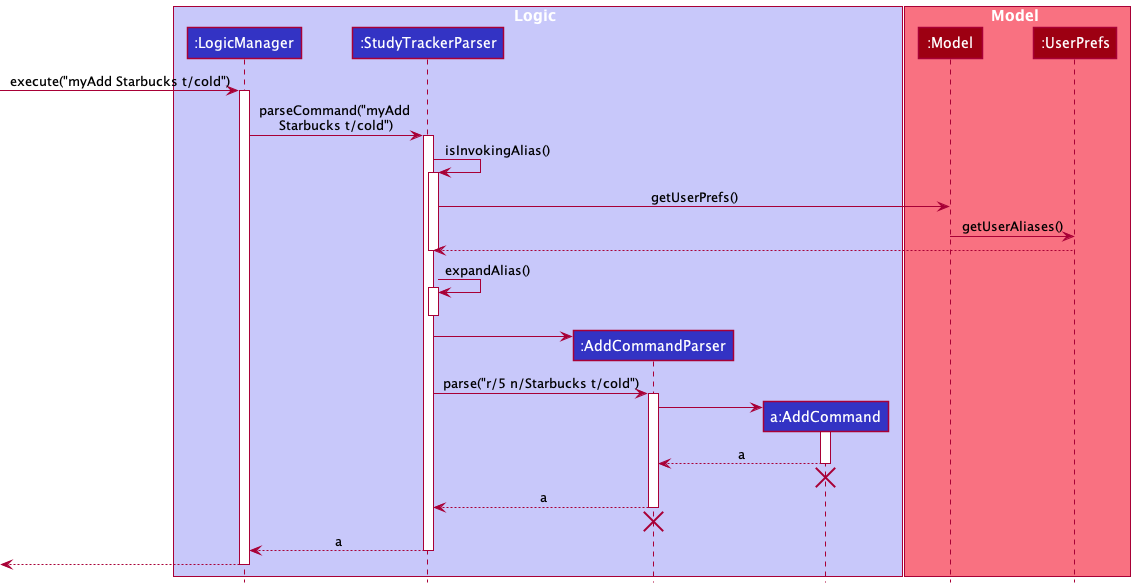
Step 3. The user executes myAdd Starbucks t/cold to add a new study spot.
Within StudyTrackerParser, alias parsing takes place by fetching user alias information in Model.
The command is expanded to add r/5 n/Starbucks t/cold.
The string is then passed to the corresponding AddCommandParser, and an AddCommand is created.
The following sequence diagram demonstrates how StudyTrackerParser parses the input with this new myAdd alias:
ParseException.
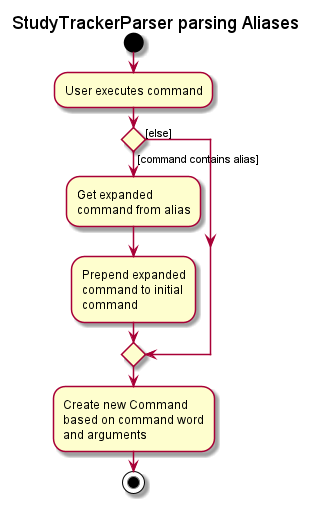
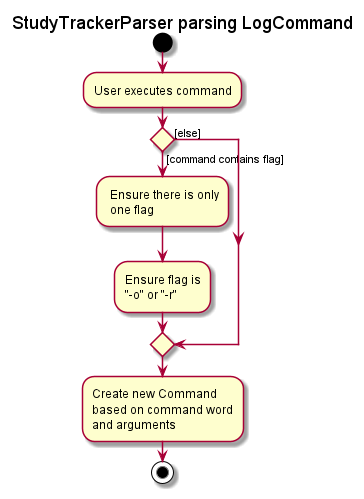
The following activity diagram summarizes what happens when a user executes a new command:
Design considerations
Aspect: What aliases should be allowed:
-
Alternative 1: Aliases only map to a single command word.
- Pros: Easy to implement.
- Cons: Not particularly useful for the user.
-
Alternative 2 (current choice): Aliases can map to commands, not just command words.
- Pros: User has more freedom to implement powerful commands.
- Cons: Implementation is slightly more challenging.
-
Alternative 3: Aliases can map to commands, including other aliases.
- Pros: User has even more freedom.
- Cons: Implementation is much more challenging (e.g. how to prevent recursion?).
Log feature
Overview
The number of hours that a user spends at a StudySpot is shown on the GUI. It is saved as a field of StudySpot, known
as StudiedHours. This number can be changed by making use of the Log feature.
Implementation of Log feature
The Log feature is facilitated by LogCommand.java, StudiedHours.java.
StudiedHours.java is a statistical field in StudySpot. It is responsible for storing the hours a user studies at a
StudySpot. It implements the following operations:
-
StudiedHours#isValidLoggedHours()– checks if a given input in a Log Command is a positive integer, and that there is no integer overflow. -
StudiedHours#addHours(StudiedHours toBeAdded)– Takes in anotherStudiedHoursand adds the two values together, returning a newStudiedHour. It also ensures that there is no integer overflow.
LogCommand.java is responsible for changing the StudiedHours field in a given StudySpot (given by its Name).
It has 4 different ways of doing so:
- By default, it adds the given input value to the current value.
- E.g. If the current StudiedHours is 4, and the user logs 3 more hours, it adds 4 and 3 together to give 7 hours.
- By using the
-oflag in the input, it overrides the original value and replaces it with the given value.- E.g. If the current StudiedHours is 4, and the user logs 3 with the
-oflag, it will override the existing 4 and replace it with 3.
- E.g. If the current StudiedHours is 4, and the user logs 3 with the
- By using the
-rflag in the input, it resets the original value to 0.- E.g. If the current StudiedHours is 4, and the user logs with the
-rflag, the value will be reset to 0.
- E.g. If the current StudiedHours is 4, and the user logs with the
- By using the
-raflag in the input, it resets the original value of ALLStudySpot’s to 0.- E.g. If the user logs with the
-raflag, all values will be reset to 0.
- E.g. If the user logs with the
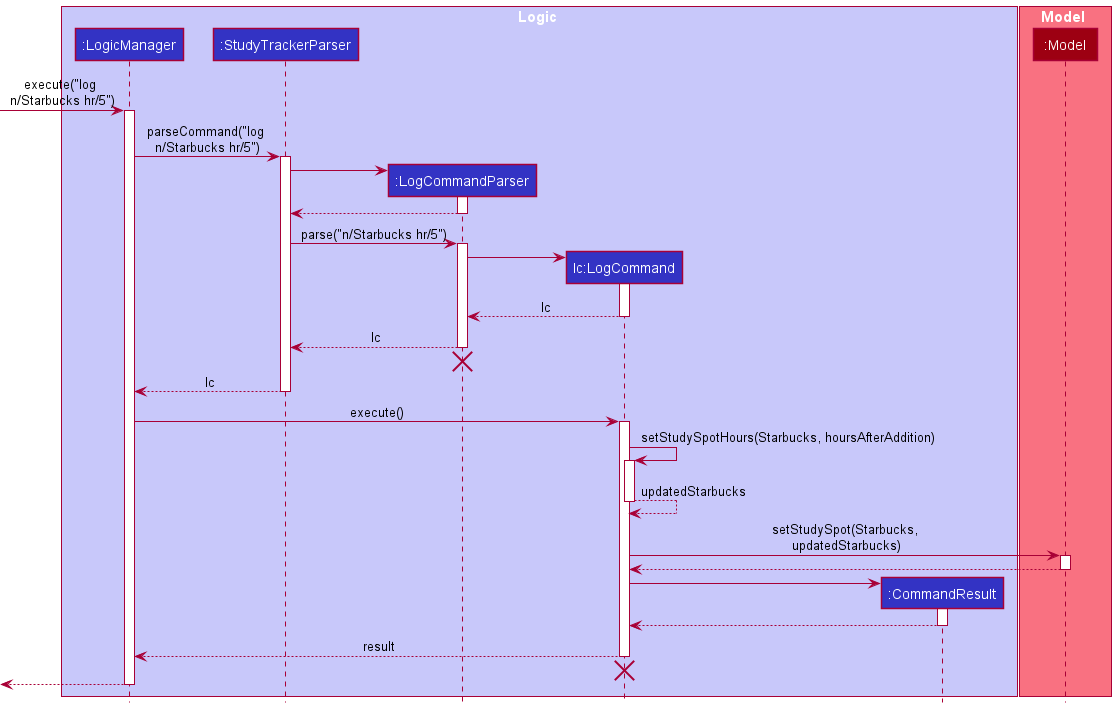
Given below is an example usage scenario and how the Log feature behaves at each step:
Step 1. The user launches the application. The program loads with the given StudySpot’s.
![]()
Step 2. The user executes log -r n/Starbucks UTown which resets the StudiedHours at Starbucks to 0.
Step 3. After studying for 3 hours at Starbucks, the user executes log n/Starbucks UTown hr/5, which adds 5 hours to 0,
resulting in the StudiedHours to become 5.
Step 4. The user realises he made a mistake, and executes log -o n/Starbucks UTown hr/3, which hard changes the
StudiedHours to 3.
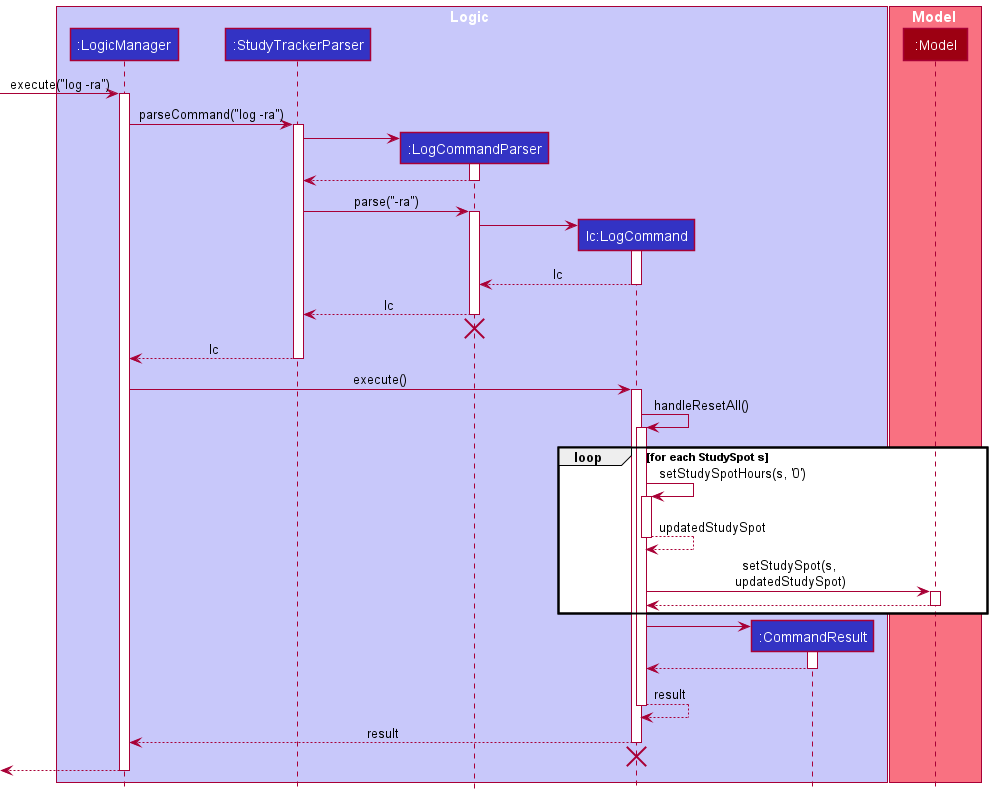
Step 5. The user wants to reset all StudiedHours to 0, so the user executes the command log -ra.
The following sequence diagram demonstrates the flow from the given input:
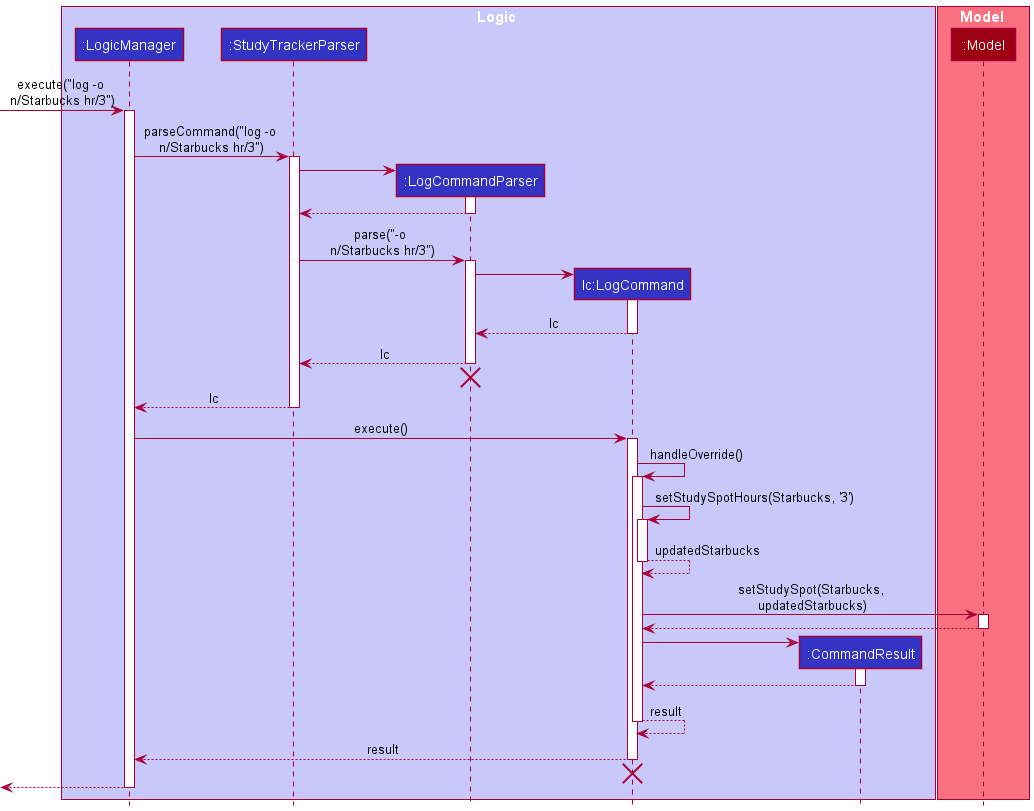
Sequence diagram for -r flag is the same as -o but with handleReset() instead of handleOverride()
The following activity diagram summarizes what happens when a user executes a new command:
Design considerations
Initially, Log Command was designed for users to keep track of how long they studied somewhere, and was supposed to only add the value provided by the user to the current value (which is the default behaviour of the log command).
Some things were considered while implementing the Log Command:
- What if a user enters an incorrect input?
- What happens if there is an integer overflow for the number of hours?
- Should users be able to change logged hours with Edit command?
To tackle these issues, the following solutions were implemented:
- Introduction of flags
- Two useful flags,
-ofor override, and-rfor reset. - Use of these flags will result in a simpler solution that is user-friendly too.
- Two useful flags,
- Limiting the number of hours that each
StudySpotcan hold- Prohibiting the addition of hours exceeding
INTEGER_MAX_VALUE, which is already an unreasonable amount of hours to be studying anyway. - Furthermore, if a user wishes to log more hours while already having
INTEGER_MAX_VALUEhours at a location, it will prompt the user to use either-oor-rto set or reset the value.
- Prohibiting the addition of hours exceeding
- Disallowing Edit to change logged hours
- Log is intended to be a command for users to use at the end of a study session at a study spot, if they wish to keep track of how long they studied there.
- Using Edit on
StudiedHoursshould provide a similar effect to the-oflag of Log, it was agreed that it was not natural and unintuitive to use Edit for this purpose.
Operating Hours
Overview
Operating hours allow users to specify the opening and closing hours of a study spot.
Implementation
Operating hours is facilitated by these classes: OperatingHours.java, StudySpot.java, AddCommand.java
and EditCommand.java.
OperatingHours.java is responsible for creating OperatingHours objects. A StudySpot object contains
an operatingHours attribute. A study spot with an OperatingHours object can be initialised with an Add command
or the operatingHours attribute can be edited with an Edit command.
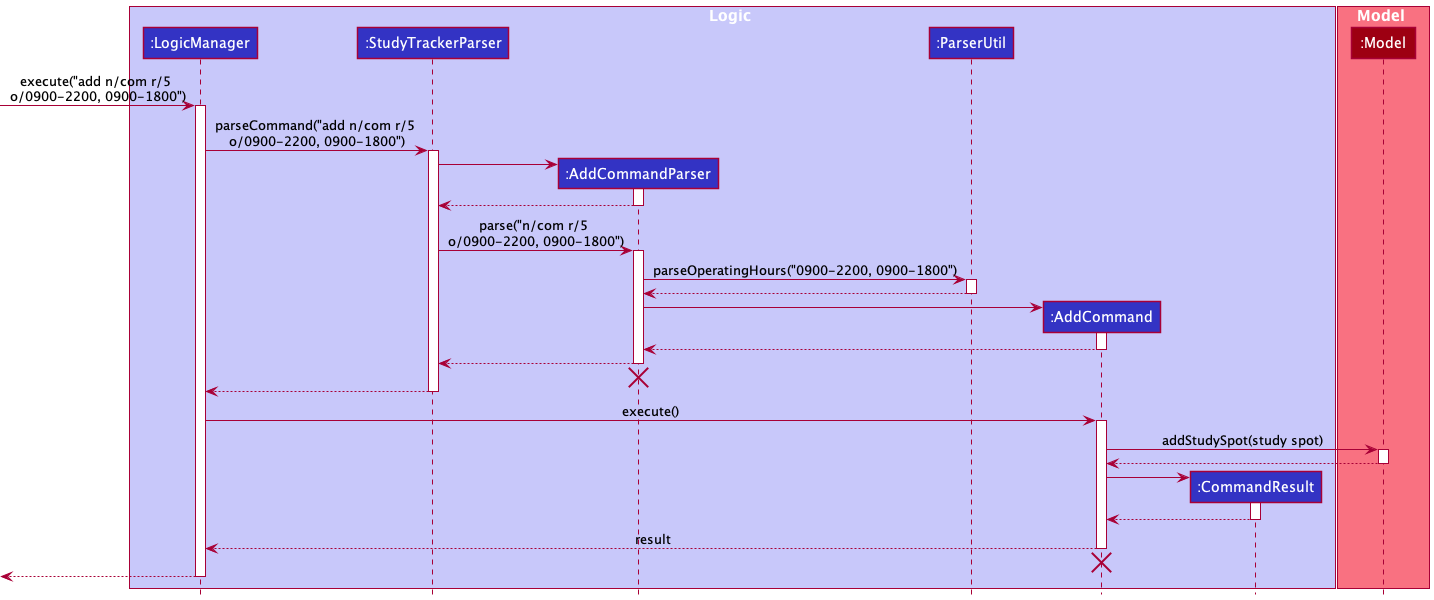
Given below is an example usage scenario of adding a study spot with operating hours and how the mechanism behaves.
Step 1. The user executes add n/com r/5 o/0900-2200, 0900-1800 to add a new study spot. StudyTrackerParser class
creates an AddCommandParser to parse the command. Since operating hours are provided in the command,
ParserUtil#parseOperatingHours(String operatingHours) is called. An AddCommand object with the study spot to be
added is then created.
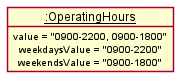
The following object diagram illustrates the OperatingHours object created.
Step 2. LogicManager executes the AddCommand object, calling Model#addStudySpot(StudySpot studySpot) so that
a new study spot is added to the model in StudyTracker.
The following sequence diagram demonstrates how StudyTrackerParser parses the command.
Amenities
Overview
Users are able to add amenities such as wifi, food, aircon and charger to a study spot.
Implementation
Amenity is facilitated by these classes: Amenity.java, StudySpot.java, AddCommand.java and EditCommand.java.
Amenity.java is responsible for creating Amenity objects. A StudySpot object contains
an amenities attribute. A study spot with an Amenity object can be initialised with an Add command
or the amenities attribute can be edited with an Edit command.
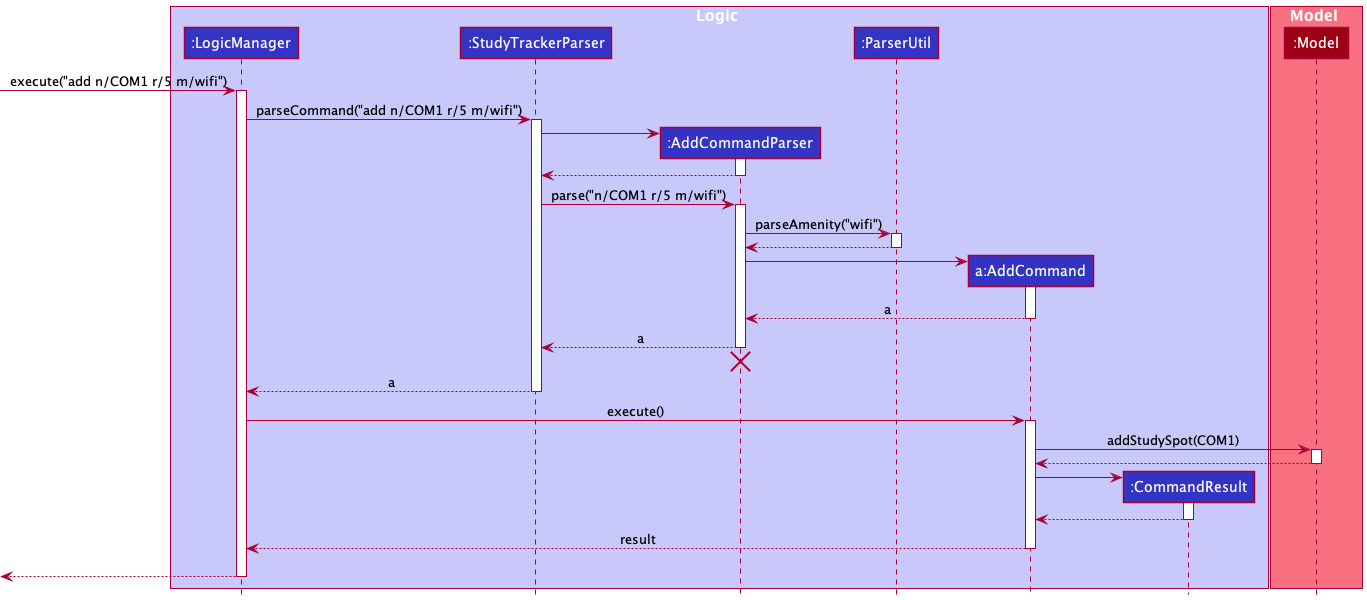
Given below is an example usage scenario of adding a study spot with the wifi amenity and how the mechanism behaves.
Step 1. The user executes add n/COM1 r/5 m/wifi to add a new study spot. StudyTrackerParser class
creates an AddCommandParser to parse the command. Since an amenity is provided in the command,
ParserUtil#parseAmenity(String amenity) is called. An AddCommand object with the study spot to be
added is then created.
Step 2. LogicManager executes the AddCommand object, calling Model#addStudySpot(StudySpot studySpot) so that
a new study spot is added to the model in StudyTracker.
The following sequence diagram demonstrates how StudyTrackerParser parses the command.
Enhanced List Command
Overview
The List Command is enhanced to support filtering of favourites, tags, amenities and rating.
Implementation
The Model component stores the currently ‘selected’ StudySpot objects as a separate filtered list. The filter of this list can be updated using Model#updateFilteredStudySpotList(Predicate<StudySpot> predicate).
The following activity diagram outlines the general parsing and execution of a ListCommand.

Upon entering a command, the user’s input command is parsed and a ListCommandParser is created.
The parser looks out for flags given in the user’s input and checks if the associated parameters are given correctly
ListCommandParser then creates a ListCommand object with a Predicate<StudySpot> that tests for
the specified conditions by the user. Logic Manager proceeds to execute ListCommand and a CommandResult object
is created. The result is returned to Logic Manager.
Given below is an example usage scenario and how the list mechanism behaves at every step.
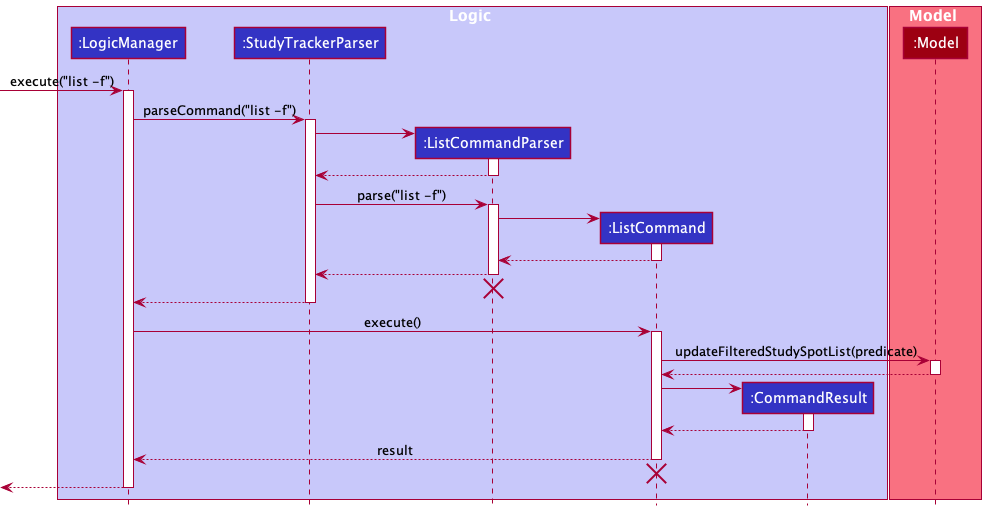
Step 1. The user executes list -f command to show all favourites in the StudyTracker. StudyTrackerParser class
creates a ListCommandParser to parse the command and creates a ListCommand object with a Predicate<StudySpot>
that filters for favourite StudySpots.
Step 2. LogicManager executes the ListCommand object, calling
Model#updateFilteredStudySpotList(Predicate<StudySpot> predicate). This updates the model in StudyTracker to show
only favourite StudySpots to the user.
The following sequence diagram demonstrates how StudyTrackerParser parses the command.
Design considerations
Behaviour of filters with multiple tags:
- Alternative 1 (current choice): Filtering by tags show study spots that all specified tags.
- Alternative 2: Filtering by tags show study spots that contain at least one of the specified tags.
The current choice was chosen as it is intuitive and most modern desktop applications follow this behaviour.
Enhanced Edit Command
Overview
The Edit Command is enhanced to support the removal of specific tags and amenities.
Implementation
The Edit Command is facilitated by two classes: EditCommand.java and EditCommandParser.java.
Given below is an example usage scenario of removing a tag from a study spot and how the mechanism behaves.
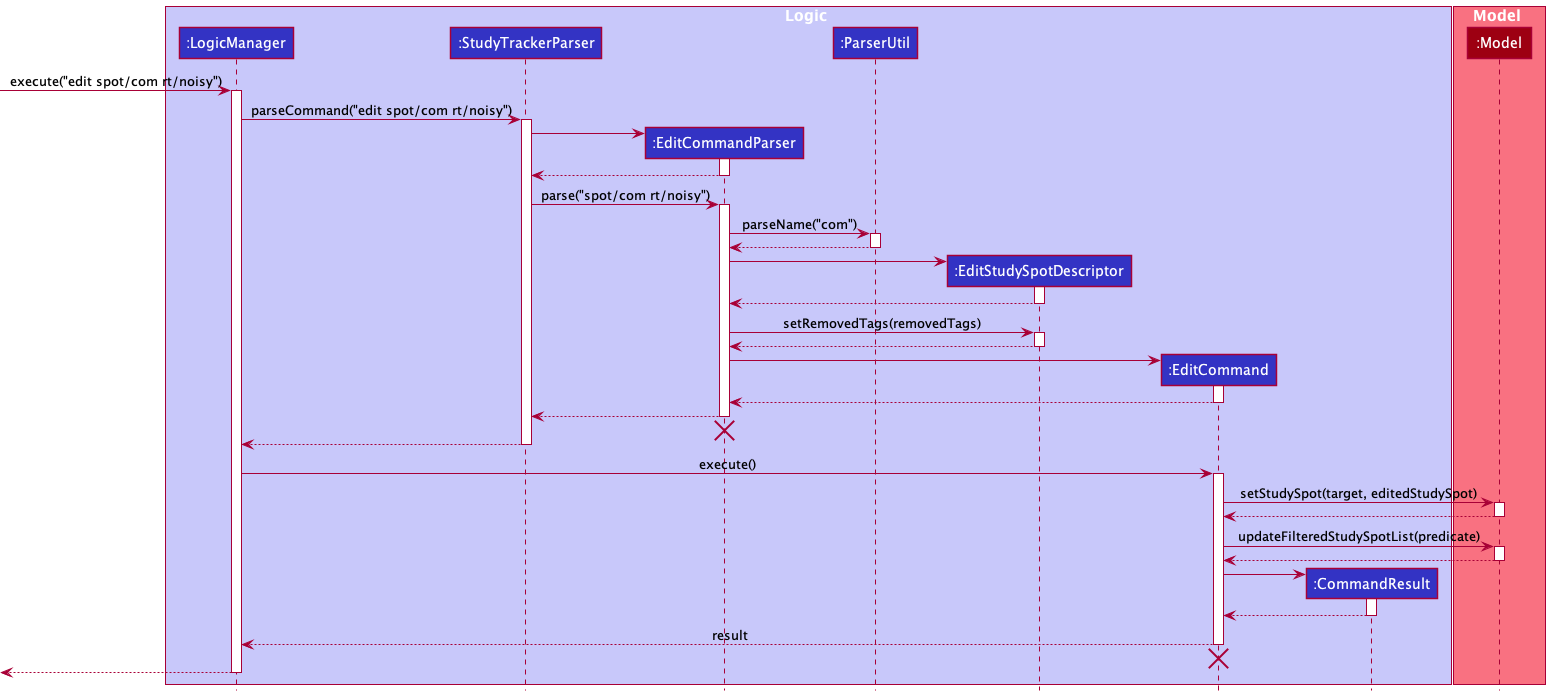
Step 1. The user executes edit spot/com rt/noisy to remove the Tag noisy from the StudySpot com.
StudyTrackerParser then parses this input and creates an EditCommand object.
Step 2. LogicManager executes the EditCommand object and updates the model in StudyTracker with the edited study
spot.
The following sequence diagram demonstrates how StudyTrackerParser parses the command.
Design considerations
Aspect: How to increase the ease of removing fields in a study spot:
- Alternative 1 (current choice): Users can directly remove a tag or an amenity they specify.
- Alternative 2: Users have to retype existing tags or amenities if they wish to retain them.
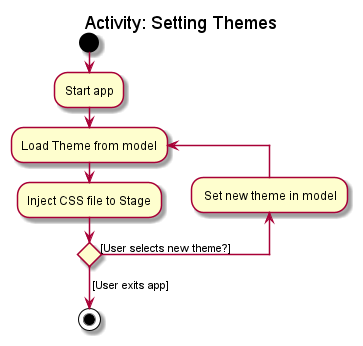
Themes
Overview
Themes allow users to customize the colours of the GUI of StudyTracker.
Implementation of Themes
The GuiSettings class handles information about GUI width, height, position, and theme.
These settings are stored by UserPrefs in the Model.
Themes are stored as Strings representing the theme name.
For example, "default" represents the default theme.
The MainWindow Ui component communicates with the Logic class to read and write the currently selected theme.
Then, the MainWindow takes the stored theme and injects the corresponding CSS file to set the colours of the JavaFX app.
In the example, "default" will be parsed to ThemeDefault.css, which is injected into the JavaFX stage.
The following activity diagram summarizes the process of customizing themes.
Themes style guide
Each theme file is named Theme[Themenamesentencecase].css
It contains 8 theme colours, utilizing CSS variables support of JavaFX.
The following are examples showing the Default and DotsDark theme.
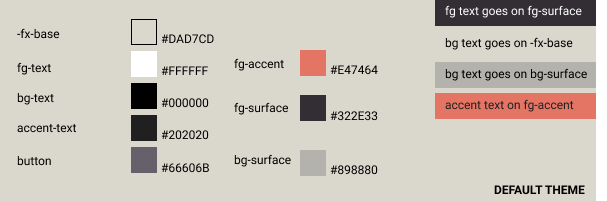
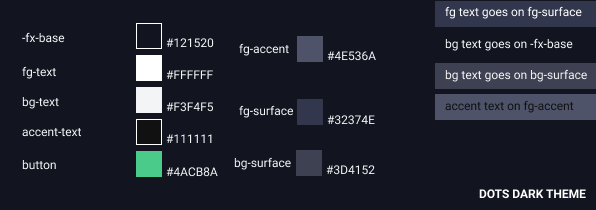
-
-fx-base— base colour of the theme and StudyTracker GUI -
fg-surface— surface colour to place primary content -
bg-surface— surface colour to place secondary content -
fg-accent— contrasting colour to act as accenting colour -
fg-text,bg-text,accent-text— text colour forfg-surface,bg-surfaceandfg-accentrespectively. -
button— button colour
Documentation, logging, testing, configuration, dev-ops
Appendix: Requirements
Product scope
Target user profile:
- computing students that wants to track their study areas
- prefer desktop apps over other types
- can type fast
- prefers typing to mouse interactions
- is reasonably comfortable using CLI apps
Value proposition: manage study spots faster than a typical mouse/GUI driven app
User stories
Priorities: High (must have) - * * *, Medium (nice to have) - * *, Low (unlikely to have) - *
| Priority | As a … | I want to … | So that I can… |
|---|---|---|---|
* * * |
new user | see usage instructions | refer to instructions when I forget how to use the App |
* * * |
user | add a new study spot | |
* * * |
user | delete a study spot | remove entries that I no longer need |
* * * |
user | find a study spot by name | locate details of study spots without having to go through the entire list |
* * |
user with limited mobile data | track wifi availability | know which study spot has wifi |
* * |
user | track food availability | know which study spot has food |
* * |
user | track air conditioner availability | know which study spot has air conditioner |
* * |
user | rate a study spot | recall previous experiences at the study spot |
* * |
user | favourite a study spot | know my preferred study spot |
* |
user with many study spots in the study tracker | sort study spots by name | locate a study spot easily |
* |
user with multiple devices | save data into a user-specified text file | transfer my data between devices |
* |
user with multiple devices | import data from a user-specified text file | transfer my data between devices |
Use cases
(For all use cases below, the System is the StudyTracker and the Actor is the user, unless specified otherwise)
UC01 - Delete a study spot
MSS
- User requests to list study spots
- StudyTracker shows a list of study spots
- User requests to delete a specific study spot in the list
-
StudyTracker deletes the study spot
Use case ends.
Extensions
-
2a. The list is empty.
Use case ends.
-
3a. The given index is invalid.
-
3a1. StudyTracker shows an error message.
Use case resumes at step 2.
-
UC02 - Add and use an alias
MSS
- User requests to add an alias
- StudyTracker adds the custom alias
- User uses the alias
-
StudyTracker parses the alias into its intended command, and executes that command.
Use case ends.
Extensions
- 1a. Alias is already defined.
-
1a1. StudyTracker will overwrite the existing definition
Use case resumes at step 2.
-
- 1b. The given alias is invalid.
-
1b1. StudyTracker shows an error message.
Use case resumes at step 1.
-
- 4a. Command executes with error.
-
4a1. StudyTracker shows an error message.
Use case ends.
-
UC03 - List by favourites
MSS
- User requests to view list by favourites.
-
StudyTracker shows all favourite study spots.
Use case ends.
Extensions
- 1a. Invalid flag is given
-
1a1. StudyTracker shows an error message.
Use case ends.
-
Non-Functional Requirements
- Should work on any mainstream OS as long as it has Java
11or above installed. - Should work without requiring an installer.
- Should not depend on remote servers.
- Should have automated test coverage for >70% of the codebase.
- Should have GUI that is usable for screen resolutions 1280x720 and higher.
- Should have documentation for users to get them familiar with the basics of the program.
- Should have documentation for potential developers to get them familiar with the basics of developing the program.
- Should be able to save user data into human-readable and human-editable text files.
- Should be able to hold up to 1000 study spots without a noticeable sluggishness in performance for typical usage.
- Should be designed for use by a single user
- A user with above average typing speed for regular English text (i.e. not code, not system admin commands) should be able to accomplish most of the tasks faster using commands than using the mouse.
- StudyTracker is offered as a Free, Open Source Software (FOSS) program, licensed under the MIT License.
Glossary
- Mainstream OS: Windows, Linux, Unix, OSX
- Private contact detail: A contact detail that is not meant to be shared with others
- Usable: All functions can be used even if the user experience is not optimal
Appendix: Instructions for manual testing
Given below are instructions to test the app manually.
Launch and shutdown
-
Initial launch
-
Download the jar file and copy into an empty folder.
-
Double-click the jar file.
Expected: Shows the GUI with a set of sample study spots. The window size may not be optimum.
-
-
Saving window preferences
-
Resize the window to an optimum size. Move the window to a different location. Close the window.
-
Re-launch the app by double-clicking the jar file.
Expected: The most recent window size and location is retained.
-
-
Saving custom themes
-
Set a colour theme in the Settings by accessing
File > Settingsin the Menu Bar and selecting a Theme. -
Click on
Saveto apply this theme.
Expected: The GUI will change colour to the selected theme. -
Close the window.
-
Re-launch the app by double-clicking the jar file.
Expected: The GUI will launch with the selected theme.
-
Adding a study spot
-
Adding a study spot to StudyTracker
-
Prerequisites: Do not have a study spot named ‘Test Spot’ already in StudyTracker
-
Test case:
add n/Test Spot r/5 m/wifi a/Testing
Expected: A study spot named Test Spot, with rating 5, amenity [wifi], address: “Testing” is added to the list. Details of the added study spot is shown in the status message. The study spot is also displayed in the GUI (might require scrolling down the list of study spots). -
Test case:
add n/Test Spot r/3
Expected: No study spot is added as there already exists a study spot named ‘Test Spot’. Error details shown in the status message. -
Other incorrect add commands to try:
add New Place,add n/New Place
Expected: Error messages for invalid command format is shown.
-
Deleting a study spot
-
Deleting a study spot while all study spots are being shown
-
Prerequisites: Have at least 1 study spot in the list.
-
Test case:
delete n/Central Library
Expected: The study spot named Central Library is deleted from the list. Details of the deleted study spot shown in the status message. -
Test case:
delete n/INVALID
Expected: No study spot is deleted as there does not exist a study spot named ‘INVALID’. Error details shown in the status message. Similar error message will show if user tries to delete a study spot that does not exist in the list. -
Other incorrect delete commands to try:
delete Central Library,delete spot/Central Library
Expected: Similar to previous.
-
Adding and using aliases
- Adding a custom alias
- Test case:
alias al/myAdd cmd/add r/5 n/myAdd myPlace
Expected: A new study spot ‘myPlace’ with rating 5 is added. Details of this new study spot is shown in the GUI. (i.e. the Add command has been executed successfully).
- Test case:
myAdd
Expected: No study spot is added. (i.e. the Add command is missing parameters). Error details shown in the status message.
- Test case:
- Overwriting an existing alias
- Test case:
alias al/myAdd cmd/listmyAdd
Expected: All study spots are listed (i.e. the List command has been executed successfully)
- Test case:
- Removing an alias
- Test case:
unalias al/myAddmyAdd
Expected: Unknown command execution. Error details shown in the status message.
- Test case:
Logging hours at a study spot
-
Logging hours studied at a study spot
-
Prerequisites: Have a study spot named ‘Test Spot’ already in StudyTracker with 0 hours logged. Refer to Test case “Adding a study spot” for steps to achieve this.
- Test case:
log n/Test Spot hr/25
Expected:- The study spot named Test Spot will get 25 hours logged to it.
- The Hours Studied section of the card will be updated to show “25 hours”.
- The Hours Studied pie chart will update total hours with 25 additional hours.
- The Hours Studied pie chart will have a segment for Test Spot with 25 hours, which shows on mouseover.
- Test case:
add log -ra
Expected: The studied hours are reset from all study spots. The Hours Studied pie chart will not show, and total hours for all study spots are 0.
-